Friday, August 23, 2013

Hinges & Knobs

It's Friday!!  And I have posted 3 days in a row!  Don't get used to it people.  We all know it is a small miracle.  I am not promising this next week.  :)  But I will try.

I hope everyone has a great, relaxing weekend planned.  Our plan is to work on the kitchen.  Surprise, surprise.  It's almost done and we are getting super excited.

I haven't really talked about our budget for the kitchen update but we do have one and I have tried really hard to stick to it.  There are many things I found online or we decided to go with a different product so we saved money.  Then there are a few items that we splurged on.  One of the biggest splurges was on the hinges.  Hinges?  Yes, hinges.  Sounds silly, I know, but it was worth it.

I have dealt with hinges and other hardware a lot working with furniture.  I don't mind painting pulls and knobs but painting hinges is a sin.  Even the best paint can not handle the constant moving and rubbing that happens with hinges.  Problem with this philosophy is I have to be able to incorporate the original color of the hinges, assuming they are in good enough shape to reuse, or I have to find new ones that will work/fit.  You would think finding new ones would be easy but its not.  Time and time again I have purchased new hinges that seem to be the same size (same hole spacing, same length, etc) but then when I install them, things don't line up correctly.  The problem....apparently now the cylinder in a hinge is made bigger and it messes everything up!


This happened when I tried to replace our kitchen hinges.  Our old ones were tarnished/dirty brass color and I wanted polished chrome.  There were 3 different sets at the local stores that looked exactly like our old ones but when we installed them NONE of them worked.  AHHHH!  I was so frustrated.  I really didn't know what to do.  I could not have those ugly old ones in my kitchen.  It would ruin what I was trying to accomplish.  Using one of the other sets would consist of filling all the old nail holes, sanding them smooth and drilling holes for the new hinges and it would be extremely time consuming.  Also, there was a chance that after all that, the new hinges still might not line the doors up correctly.

So since I couldn't find new ones, I started researching on how to change the old ones.  Not paint.  Change.  Forever change.  I looked into powder coating and chrome plating.  We decided to go with chrome plating.  Where do you get that done you ask?  A custom auto body shop, that's where.  My husband found a place near his work that does chrome plating on vehicle parts.  Speed & Sport Chrome Plating said they could do my hinges!  PERFECT!  They did one as a test piece and it is beautiful.  Finally, an answer to my problem and it was gorgeous.  Just look at this before and after.


Then I had a new problem.  The price.  They gave us an estimate to do all 50 hinges.  I had to sit down.  I didn't want to do the chrome plating anymore.  It was way over budget.  I get sweaty palms when I have to spend a lot of money and I sweaty all over when I heard the quote.  My husband reasoned with me and twisted my arm a bit and I finally gave in.  All the time we were saving, the professional look we were going to get and knowing that these hinges could handle all the opening and closing, would be worth it....hopefully.  Brian walked himself into an auto body shop that has done work for famous people with a gallon ziploc baggie full of hinges.  Then later that week he walked out with a box of beautiful chrome hinges.


BEAUTIFUL!  Shiny hinges that fit my kitchen cabinet door perfectly and I didn't have to fill or drill any holes.  Love that.

Here are my knobs.  There are no pulls in our kitchen.  All of our drawers are pretty small and they all previously had knobs so I kept it that way.  I found these gorgeous glass knobs here.  This online store has tons of pulls and knobs to choose from at a great price.


I talked about our other appliances here but I haven't mentioned the sink and faucet yet.  I purchased both online and saved.  The faucet I saw in a store and liked it's look and functionality.   After doing a little online research, I found it at an online kitchen store for half the price!


My sink is a gigantor (yes, that is a word)  undermount, single basin, stainless steel and is 11 inches deep!  It is a small swimming pool really.  I wanted a sink big enough to fit my cast iron skillet (my go to pan) flat on the bottom and I wanted it to fit a casserole/baking dish to soak.  I purchased it on Overstock.com for an under budget price, too!  Love that feeling.


Thanks to everyone that is reading and spreading the word about my business.  Remember to subscribe to follow me by email to get notices when I update the blog.  Also, my paint booth is done and as soon as the kitchen is finished, I will be taking on furniture jobs again.  If you are interested in getting some work done or are looking for a piece, let me know!  Email me at fishermanswifefurniture@yahoo.com or message me on Facebook.

Have a great weekend.  Wish us luck on our next step in the kitchen.  It is going to be a hard weekend but hopefully we will get a lot accomplished and I will have tons of updates for next week!

Click here to see the finished kitchen.

Thursday, August 22, 2013

Covering Fur Down - The Space Above the Cabinets

January 2016 Update: Visit our new blog www.brianandkaylor.com  


Changing that space above your cabinets is a great way to update your kitchen.


You know that annoying space between the top of the kitchen cabinets and the ceiling?  What is that?  And why did someone ever think it was a good idea to leave it blank?  You all know what I am talking about.


Or it is filled in with useless wall like I have.  The construction term is fur down.


Only in the past few years have cabinet styles changed to where they extend to the ceiling.  This is the look I like.


In New Orleans we had crazy tall ceilings and the space between the cabinets and the ceiling was huge. So just like everyone else, I filled that space with dust collectors.


I loathe this space.   If we had purchased new cabinets, I would have tore it out and had our cabinets built to the ceiling.  But we used our current cabinets so I had to figure out a way to hide the fur down. Your home might have AC and/or other wires and pipes going through the fur down so you can't remove yours without the huge cost to run all those wires and pipes somewhere else.  Making it look like it was built in and giving the illusion that our cabinets were built to the ceiling was the only option I had.

The before pictures.


While researching for a refrigerator enclosure idea, I came across this blog.  She started with an empty space above her cabinets so she filled it in with MDF, and then finished off with moulding.  I love her final look.

I already had the fur down in my kitchen so I didn't need to fill in the space but I did need to smooth the texture.  Doing several thin layers, I filled in the texture with a light weight compound.  I spread it all over, sanded, filled some more, sanded again.  I did this until it was filled in and smooth.

Then I moved on to the moulding.  I went with a 3 5/8 inch crown moulding (nothing crazy) and a chair rail moulding for the middle.  Both are extended throughout the kitchen where there is fur down and the crown moulding is extended through to the dining area.  We will be adding crown moulding to all the rooms in the house eventually.


SIDE NOTE:  Our saw was not in good condition and we ended up buying a new one.  This saw had a chart on it as well as had the degrees needed for mouldings marked.  This made things a lot easier but moulding can still be frustrating.  Once you get the hang of it, it is worth the time and the few "discussions" with your spouse.


Remember the whole idea here is to make this look like it is part of the cabinetry.   I wanted a seamless  look.  It took some tedious, time consuming, detail work but the final product was so worth it.  It looks amazing!  Here is the after but I am still hiding the rest of the kitchen.  Sorry folks.  Your going to have to keep being patient. :)


LOVE!!!!  Our cabinets have entered this decade and look expensive!  A DIYer's dream.  Expensive look without the huge expense.  I still stare at them because I can't believe how much they have changed.

You can use moulding to change your cabinet doors, too.  I did not do this but if you are wanting to update your kitchen without replacing cabinets, adding moulding is a great way to do it.


Click here to see all the before and after pictures.


Wednesday, August 21, 2013

DIY Refrigerator Enclosure

January 2016 Update: Visit our new blog www.brianandkaylor.com  


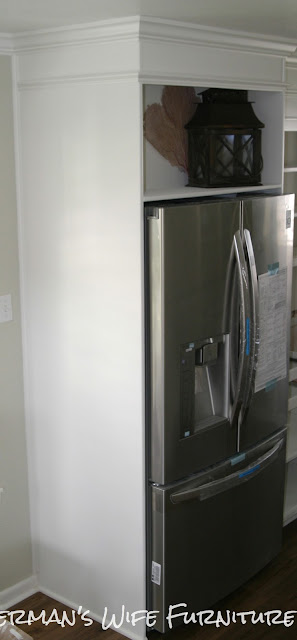
Today I am going to show you my refrigerator enclosure.


Just to remind you, the previous refrigerator was big, white, bulky and hanging out at the end of the cabinets.


As soon as I knew we were buying the house the wheels were turning and I started researching on how to fix the fridge problem.  There had to be a way to make it look like it belonged in the kitchen and not just shoved at the end of the cabinets.  I saw several people on the blogosphere built enclosures for their refrigerators and added it to the current cabinetry.  GENIUS!!

  Here is an example of what I am talking about.

Just add a box...simple right.  BAHAHA!!!!!   I should know better.  The problem with a project like this is no matter how good the tutorial is or detailed the pictures are, each situation is different.  My cabinets are a different size, my refrigerator is a different size (I purchased a counter depth), my ceiling height is different....you get my point.  I had to come up with a strategy for my situation.  It wasn't too bad but it did not turn out exactly as planned.

My first problem was most of the tutorials had a set of cabinets to use above the fridge that matched the current cabinets.  This made it look like the box was built with the cabinets.   I tried to take my current ones down and they wouldn't  budge.  The cabinets were built off of each neighboring cabinet.  Meaning, I coudn't get the cabinets above the fridge down without hurting the ones next to it so I had to scratch that idea.   Since I could not remove the cabinets above the fridge I had to build the box around them which complicated things.  I decided to cover the cabinet and put a shelf over the fridge instead.  I now have a home for my cookbooks.   Here are some progress shots.


The moldings on the fur down are continued around the new enclosure.  Read about the space of the cabinets here.

I used my handy dandy Kreg Jig to make all the connections hidden.  This also helped with the braces we put along the back and gave me a way to secure the box into the floor.  For me that was the scariest part....drilling holes into my new flooring.  Talk about a measure 10 times, drill once kind of situation.


Here are the after pictures and yes I still have the stickers on my fridge.  It has been moved around a lot so I have tried to protect it as much as possible.  Also, I can't find my cookbooks.  At the moment, they are lost in the hot steamy abyss also known as the POD. :)


 custom furniture Galveston Houston Tx, white kitchen, painted kitchen cabinets, DIY refrigerator enclosure


I. LOVE. IT.  Other than the paint color, buying a counter depth fridge and having it boxed in has totally changed the room.  It feels so much bigger!  Thank you to my husband for trusting me with this idea and helping me with it.  Sometimes I can tell he is not so sure about my crazy ideas (not sure why) but trusts me anyway and helps me when I ask for it.  Thanks, babe!


UPDATE:


Click here to see all the before and after pictures of the kitchen.


This post was a runner up in One Project Closer's The Better Half Before & After contest!  Pretty Handy Girl was the Co-Host that week.  Check out the winner and other runner-ups here!

he Humble Brag Supporting Habitat for Humanity